> ## Documentation Index
> Fetch the complete documentation index at: https://help.aichat.com/llms.txt
> Use this file to discover all available pages before exploring further.
# HubSpot
> Link your HubSpot account to sync contacts or automate broadcast to new contacts
By connecting your HubSpot account with AiChat, you can:
* Push data collected from leads generation flows to HubSpot Marketing forms
* Get updated contact information by syncing your HubSpot contacts into AiChat's platform
* Engage when new contact leads using automated WhatsApp follow-ups
# Connect Your HubSpot Account
 ### Requirements:
* Your HubSpot account role is a **Super Admin** to connect
* You must login to your HubSpot account
### **Step 1: Integrate HubSpot Account in AiChat**
1. In your AiChat dashboard, go to **Settings → Integrations → HubSpot**
2. Click **Connect HubSpot** and follow the prompts to link your accounts. You will be redirected to HubSpot platform to authenticate and complete the integration.
3. Select the HubSpot account you wish to connect.
4. Upon successful registration, you will return back to AiChat portal with account connected.
### Step 2: Configure the main WhatsApp contact list to sync
If your HubSpot contacts have provided their WhatsApp numbers, you can have them automatically added and synced whenever their contact profile is updated.
### Requirements:
* Your HubSpot account role is a **Super Admin** to connect
* You must login to your HubSpot account
### **Step 1: Integrate HubSpot Account in AiChat**
1. In your AiChat dashboard, go to **Settings → Integrations → HubSpot**
2. Click **Connect HubSpot** and follow the prompts to link your accounts. You will be redirected to HubSpot platform to authenticate and complete the integration.
3. Select the HubSpot account you wish to connect.
4. Upon successful registration, you will return back to AiChat portal with account connected.
### Step 2: Configure the main WhatsApp contact list to sync
If your HubSpot contacts have provided their WhatsApp numbers, you can have them automatically added and synced whenever their contact profile is updated.
 1. In your AiChat dashboard, go to **Settings → Integrations → HubSpot → Sync Details**
2. Choose a HubSpot list that contains the contacts with phone numbers. Ideally, it should be a dynamic list. Learn how to [create HubSpot List](https://knowledge.hubspot.com/segments/create-active-or-static-lists).
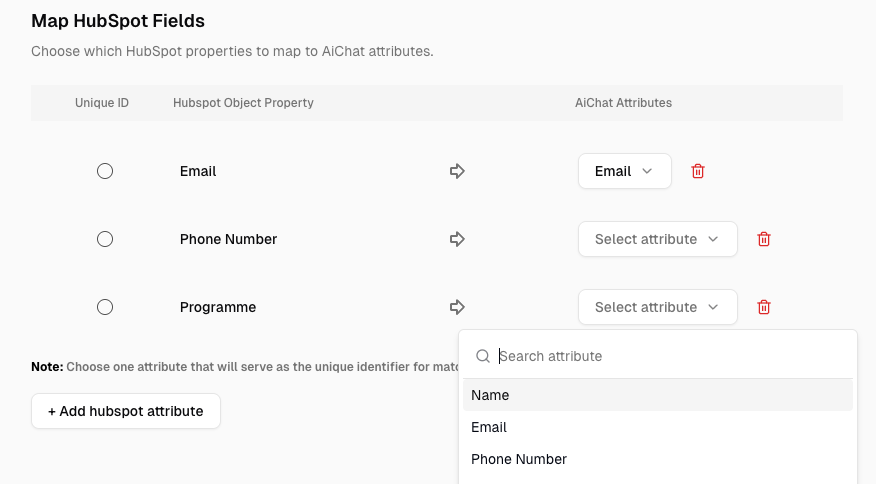
3. Select the fields you would like to bring across when importing contacts to our platform. You must select at least one, and one of it must be the unique identifier like Email.
4. Lastly, select if you want to auto-sync the contacts whenever they are updated on HubSpot, or perform a one-time import.
5. Once you are ready, click **Start Import** to begin bringing in current contacts in the HubSpot list. Once completed, all contacts at the time of import will be available in our system.
HubSpot uses property Email by default as the unique identifier. If you are using something else, remember to add and map the specific field and setup as the unique identifier.
Our platform picks property **Phone Number** by default as the WhatsApp number. There is no need to map this
# Broadcasting with HubSpot List
If you are using specific HubSpot segmenting conditions on your HubSpot lists, you can use them directly to broadcast to these users. This simplifies managing one source of segmentation logic - by using HubSpot.
### **How to Setup:**
1. Ensure you have integrated your HubSpot account.
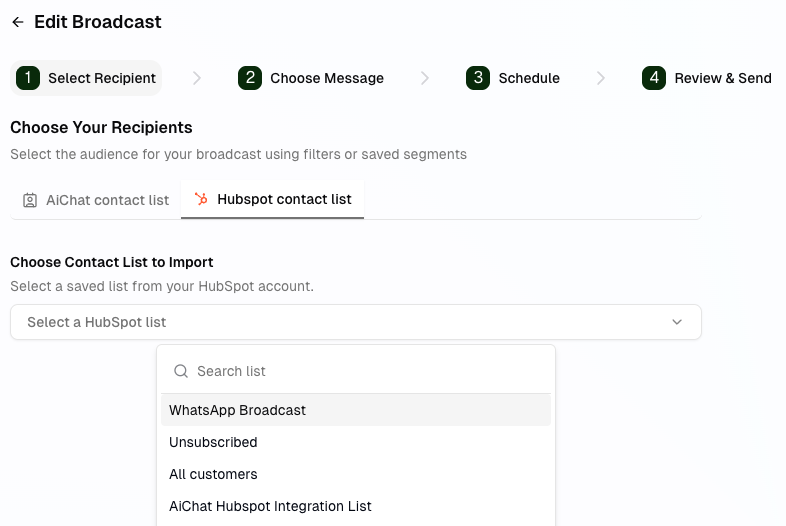
2. In your AiChat dashboard, go to **WhatsApp Broadcast → Create Broadcast**
3. Under Recipients, click **HubSpot Contact List tab** and select the desired HubSpot list.
4. Continue with [setting up the broadcast](/activatingwhatsappbroadcast).
1. In your AiChat dashboard, go to **Settings → Integrations → HubSpot → Sync Details**
2. Choose a HubSpot list that contains the contacts with phone numbers. Ideally, it should be a dynamic list. Learn how to [create HubSpot List](https://knowledge.hubspot.com/segments/create-active-or-static-lists).
3. Select the fields you would like to bring across when importing contacts to our platform. You must select at least one, and one of it must be the unique identifier like Email.
4. Lastly, select if you want to auto-sync the contacts whenever they are updated on HubSpot, or perform a one-time import.
5. Once you are ready, click **Start Import** to begin bringing in current contacts in the HubSpot list. Once completed, all contacts at the time of import will be available in our system.
HubSpot uses property Email by default as the unique identifier. If you are using something else, remember to add and map the specific field and setup as the unique identifier.
Our platform picks property **Phone Number** by default as the WhatsApp number. There is no need to map this
# Broadcasting with HubSpot List
If you are using specific HubSpot segmenting conditions on your HubSpot lists, you can use them directly to broadcast to these users. This simplifies managing one source of segmentation logic - by using HubSpot.
### **How to Setup:**
1. Ensure you have integrated your HubSpot account.
2. In your AiChat dashboard, go to **WhatsApp Broadcast → Create Broadcast**
3. Under Recipients, click **HubSpot Contact List tab** and select the desired HubSpot list.
4. Continue with [setting up the broadcast](/activatingwhatsappbroadcast).
 At the time of broadcast, our platform will import and update contacts from the HubSpot list based on the mapping configuration.
# Advance Flow Actions with HubSpot API
You can use HubSpot API to perform several flows such as:
1. Collecting the leads and Update Marketing Forms
2. Check if user exists in HubSpot and save the information into profile
3. Update user's HubSpot contact information.
Below are some examples:
## Submit Marketing Form
After collecting information from your prospective leads, you can send the data over to HubSpot using **Send Http** action node.
At the time of broadcast, our platform will import and update contacts from the HubSpot list based on the mapping configuration.
# Advance Flow Actions with HubSpot API
You can use HubSpot API to perform several flows such as:
1. Collecting the leads and Update Marketing Forms
2. Check if user exists in HubSpot and save the information into profile
3. Update user's HubSpot contact information.
Below are some examples:
## Submit Marketing Form
After collecting information from your prospective leads, you can send the data over to HubSpot using **Send Http** action node.
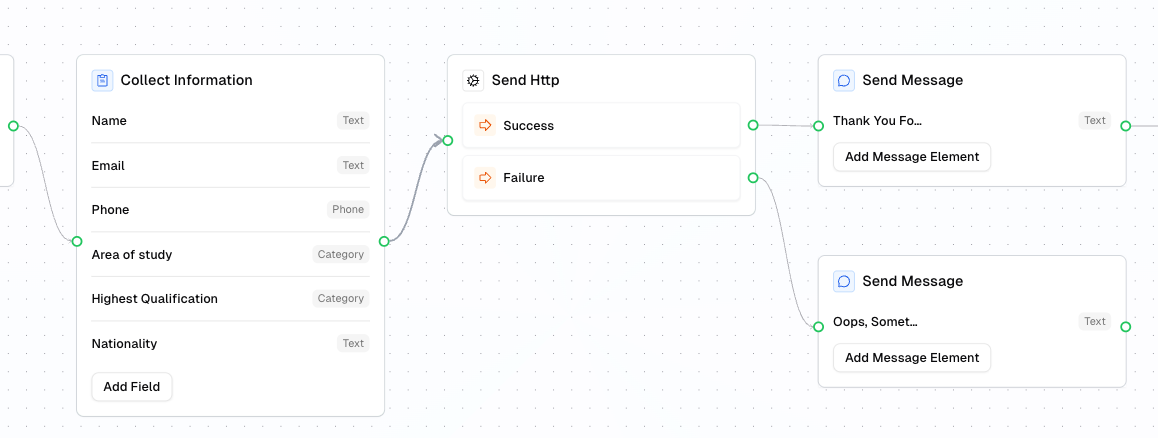 This utilises HubSpot API [Submit data to Marketing form](https://developers.hubspot.com/docs/api-reference/legacy/forms-v3-legacy/post-submissions-v3-integration-secure-submit-portalId-formGuid). Please refer to HubSpot's API documentation for details on how to use their endpoints.
**Send Http Node Configuration Example:**
```Method Method and URL theme={null}
Method: POST
URL: https://api.hsforms.com/submissions/v3/integration/secure/submit/{your-hubspot-account-id}/{hubspot-form-id}
```
```Header Header theme={null}
Authorization: Bearer {{hubspot_token}}
// Our system will retrieve the latest HubSpot token for you.
```
```Body Body theme={null}
{
"fields": [
{
"objectTypeId": "0-1",
"name": "email",
"value": "{{user.email}}"
},
{
"objectTypeId": "0-1",
"name": "firstname",
"value": "{{user.name}} "
},
{
"objectTypeId": "0-1",
"name": "nationality",
"value": "{{user.nationality}} "
},
{
"objectTypeId": "0-1",
"name": "",
"value": "{{user.phone_number}} "
}
],
"legalConsentOptions": {
"consent": {
"consentToProcess": true,
"text": "I agree to allow Example Company to store and process my personal data.",
"communications": [
{
"value": true,
"subscriptionTypeId": 999,
"text": "I agree to receive marketing communications from Example Company."
}
]
}
}
}
```
* **Method and URL**: You need to include your HubSpot account ID and the marketing form ID. Learn how to [find your HubSpot Account ID](https://knowledge.hubspot.com/account-management/manage-multiple-hubspot-accounts) or [your marketing form ID](https://knowledge.hubspot.com/forms/find-your-form-gui).
* **Header**: You will need to add the Authorization and Bearer token using our hubspot\_token attribute.
* **Body**: Add the necessary Marketing Form fields using the \*\*HubSpot's \*\*[**property internal name**](https://community.hubspot.com/t5/APIs-Integrations/How-to-discover-actual-property-names/m-p/816971) and the values mapped from our attributes.
## Get Contact Records
You can retrieve contact's info to personalise the bot engagement or help agents with customer serivce using **Send Http** action node.
This utilises HubSpot API [Submit data to Marketing form](https://developers.hubspot.com/docs/api-reference/legacy/forms-v3-legacy/post-submissions-v3-integration-secure-submit-portalId-formGuid). Please refer to HubSpot's API documentation for details on how to use their endpoints.
**Send Http Node Configuration Example:**
```Method Method and URL theme={null}
Method: POST
URL: https://api.hsforms.com/submissions/v3/integration/secure/submit/{your-hubspot-account-id}/{hubspot-form-id}
```
```Header Header theme={null}
Authorization: Bearer {{hubspot_token}}
// Our system will retrieve the latest HubSpot token for you.
```
```Body Body theme={null}
{
"fields": [
{
"objectTypeId": "0-1",
"name": "email",
"value": "{{user.email}}"
},
{
"objectTypeId": "0-1",
"name": "firstname",
"value": "{{user.name}} "
},
{
"objectTypeId": "0-1",
"name": "nationality",
"value": "{{user.nationality}} "
},
{
"objectTypeId": "0-1",
"name": "",
"value": "{{user.phone_number}} "
}
],
"legalConsentOptions": {
"consent": {
"consentToProcess": true,
"text": "I agree to allow Example Company to store and process my personal data.",
"communications": [
{
"value": true,
"subscriptionTypeId": 999,
"text": "I agree to receive marketing communications from Example Company."
}
]
}
}
}
```
* **Method and URL**: You need to include your HubSpot account ID and the marketing form ID. Learn how to [find your HubSpot Account ID](https://knowledge.hubspot.com/account-management/manage-multiple-hubspot-accounts) or [your marketing form ID](https://knowledge.hubspot.com/forms/find-your-form-gui).
* **Header**: You will need to add the Authorization and Bearer token using our hubspot\_token attribute.
* **Body**: Add the necessary Marketing Form fields using the \*\*HubSpot's \*\*[**property internal name**](https://community.hubspot.com/t5/APIs-Integrations/How-to-discover-actual-property-names/m-p/816971) and the values mapped from our attributes.
## Get Contact Records
You can retrieve contact's info to personalise the bot engagement or help agents with customer serivce using **Send Http** action node.
 This utilises HubSpot API [Contact Records](https://developers.hubspot.com/docs/api-reference/crm-contacts-v3/guide#retrieve-an-individual-contact). Please refer to HubSpot's API documentation for details on how to use their endpoints.
**Send Http Node Configuration Example:**
```Method Method and URL theme={null}
Method: GET
URL: https://api.hubapi.com/crm/v3/objects/contacts/{{user.email}}?idProperty=email&properties=email,phone,firstname
```
```Header Header theme={null}
Authorization: Bearer {{hubspot_token}}
// Our system will retrieve the latest HubSpot token for you.
```
```Body Body theme={null}
// empty - leave it blank
```
* **Method and URL**: You need to include the user's email attribute `{{user.email}}` and the properties you want back in the response. If you are using another identifier, modify the payload accordingly.
* **Header**: You will need to add the Authorization and Bearer token using our hubspot\_token attribute.
* **Body**: Leave it empty as API endpoint does not require.
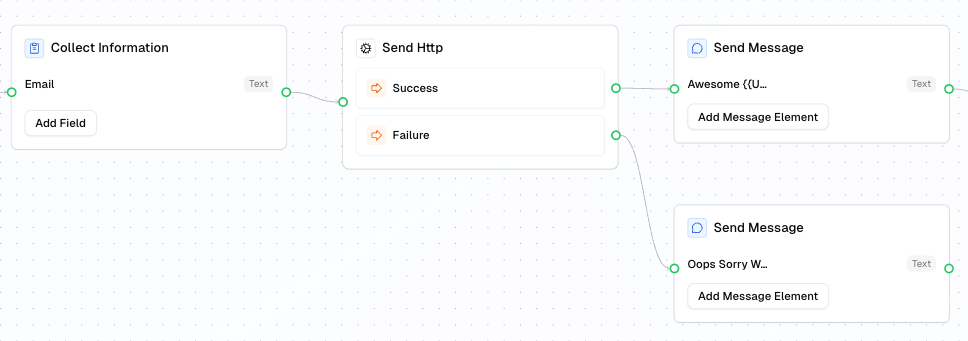
* If the contact exists, **success** path will be triggered
* If the contact does not exists,**failure** path will be triggered.
#### Saving the Response Data
If the contact exists, you can save the data into specific attributes.
1. In the same **Send Http configuration → Response Mapping**, click Test request.
2. If successful, you will see the response on the right panel. Remember to swap the placeholder `{{user.email}}` to a valid email address when testing.
3. Click on a one of the desired data you wish to save, and select the attribute you want to soave to. You can save as many of the data you wish.
4. Once done, remember to revert back to `{{user.email}}` in the Method and URL.
This utilises HubSpot API [Contact Records](https://developers.hubspot.com/docs/api-reference/crm-contacts-v3/guide#retrieve-an-individual-contact). Please refer to HubSpot's API documentation for details on how to use their endpoints.
**Send Http Node Configuration Example:**
```Method Method and URL theme={null}
Method: GET
URL: https://api.hubapi.com/crm/v3/objects/contacts/{{user.email}}?idProperty=email&properties=email,phone,firstname
```
```Header Header theme={null}
Authorization: Bearer {{hubspot_token}}
// Our system will retrieve the latest HubSpot token for you.
```
```Body Body theme={null}
// empty - leave it blank
```
* **Method and URL**: You need to include the user's email attribute `{{user.email}}` and the properties you want back in the response. If you are using another identifier, modify the payload accordingly.
* **Header**: You will need to add the Authorization and Bearer token using our hubspot\_token attribute.
* **Body**: Leave it empty as API endpoint does not require.
* If the contact exists, **success** path will be triggered
* If the contact does not exists,**failure** path will be triggered.
#### Saving the Response Data
If the contact exists, you can save the data into specific attributes.
1. In the same **Send Http configuration → Response Mapping**, click Test request.
2. If successful, you will see the response on the right panel. Remember to swap the placeholder `{{user.email}}` to a valid email address when testing.
3. Click on a one of the desired data you wish to save, and select the attribute you want to soave to. You can save as many of the data you wish.
4. Once done, remember to revert back to `{{user.email}}` in the Method and URL.
 # Update Contact Records
You can retrieve contact's info to personalise the bot engagement or help agents with customer serivce using **Send Http** action node.
This utilises HubSpot API [Update Contact Records](https://developers.hubspot.com/docs/api-reference/crm-contacts-v3/guide#update-an-individual-contact). Please refer to HubSpot's API documentation for details on how to use their endpoints.
**Send Http Node Configuration Example:**
```Method Method and URL theme={null}
Method: PATCH
URL: https://api.hubapi.com/crm/v3/objects/contacts/{{user.email}}?idProperty=email
```
```Header Header theme={null}
Authorization: Bearer {{hubspot_token}}
// Our system will retrieve the latest HubSpot token for you.
```
```Body Body theme={null}
{
"properties": {
"nationality" : "{{user.nationality}}",
"property_internal_name" : "{{user.attribute}}"
}
}
```
* **Method and URL**: You need to include the user's email attribute `{{user.email}}`. If you are using another identifier, modify the payload accordingly.
* **Header**: You will need to add the Authorization and Bearer token using our hubspot\_token attribute.
* **Body**: Include the properties you want to update and the values.
* If the contact exists, **success** path will be triggered
* If the contact does not exists,**failure** path will be triggered.
# Frequently Ask Questions
HubSpot has a API call limit, depending on your HubSpot account subscription tier. Check your usage if you have high number of contacts or performing frequent broadcasts. If so, you may consider increasing your API limit with HubSpot.
Read more at [https://developers.hubspot.com/docs/developer-tooling/platform/usage-guidelines#rate-limits](https://developers.hubspot.com/docs/developer-tooling/platform/usage-guidelines#rate-limits)
# Update Contact Records
You can retrieve contact's info to personalise the bot engagement or help agents with customer serivce using **Send Http** action node.
This utilises HubSpot API [Update Contact Records](https://developers.hubspot.com/docs/api-reference/crm-contacts-v3/guide#update-an-individual-contact). Please refer to HubSpot's API documentation for details on how to use their endpoints.
**Send Http Node Configuration Example:**
```Method Method and URL theme={null}
Method: PATCH
URL: https://api.hubapi.com/crm/v3/objects/contacts/{{user.email}}?idProperty=email
```
```Header Header theme={null}
Authorization: Bearer {{hubspot_token}}
// Our system will retrieve the latest HubSpot token for you.
```
```Body Body theme={null}
{
"properties": {
"nationality" : "{{user.nationality}}",
"property_internal_name" : "{{user.attribute}}"
}
}
```
* **Method and URL**: You need to include the user's email attribute `{{user.email}}`. If you are using another identifier, modify the payload accordingly.
* **Header**: You will need to add the Authorization and Bearer token using our hubspot\_token attribute.
* **Body**: Include the properties you want to update and the values.
* If the contact exists, **success** path will be triggered
* If the contact does not exists,**failure** path will be triggered.
# Frequently Ask Questions
HubSpot has a API call limit, depending on your HubSpot account subscription tier. Check your usage if you have high number of contacts or performing frequent broadcasts. If so, you may consider increasing your API limit with HubSpot.
Read more at [https://developers.hubspot.com/docs/developer-tooling/platform/usage-guidelines#rate-limits](https://developers.hubspot.com/docs/developer-tooling/platform/usage-guidelines#rate-limits)