> ## Documentation Index
> Fetch the complete documentation index at: https://help.aichat.com/llms.txt
> Use this file to discover all available pages before exploring further.
# Instagram Comment Automation
Automatically reply to Instagram comments and send follow-up messages through Instagram DM to engage users directly from your Instagram posts.
## Before You Begin
Ensure your Facebook Page is integrated with your AiChat chatbot.
If you have not connected your Instagram account yet, complete the [Instagram connection setup](/social-messaging-channels/instagram/connecting-instagram) first.
## How Instagram Comment Automation Works
When a user comments on a monitored Instagram post:
.png?fit=max&auto=format&n=iRMzc6mTqZ14qTDV&q=85&s=cb6fd0314d5437a7d35892bd278646a8) 1. AiChat detects the comment
2. The automation checks if the comment matches your trigger rules
3. AiChat replies publicly to the comment (optional)
4. AiChat sends a private message to the user’s Instagram DM (optional)
**Limitations:**
* **First Level Only:** The bot only replies to new comments, not replies made to existing comments.
* **DM Limit:** To prevent spam, the bot will only send one private Messenger DM per trigger event.
## Configuration Guide
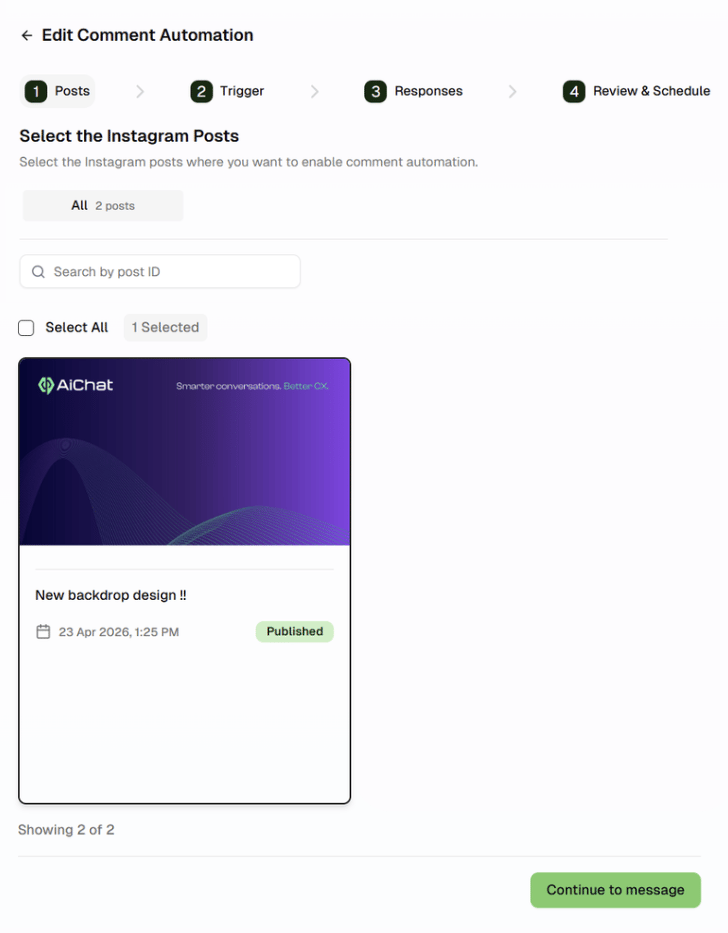
### Step 1: Create & Select Your Post
* **Navigate:** Go to **Flows → Comment Automation** and click **Create comment automation**.
* **Name it:** Enter an Automation Name and an optional description.
* **Pick Content:** Select the published or scheduled Posts or Reels you want to monitor. You can use the search bar to find posts by their post caption or ID.
1. AiChat detects the comment
2. The automation checks if the comment matches your trigger rules
3. AiChat replies publicly to the comment (optional)
4. AiChat sends a private message to the user’s Instagram DM (optional)
**Limitations:**
* **First Level Only:** The bot only replies to new comments, not replies made to existing comments.
* **DM Limit:** To prevent spam, the bot will only send one private Messenger DM per trigger event.
## Configuration Guide
### Step 1: Create & Select Your Post
* **Navigate:** Go to **Flows → Comment Automation** and click **Create comment automation**.
* **Name it:** Enter an Automation Name and an optional description.
* **Pick Content:** Select the published or scheduled Posts or Reels you want to monitor. You can use the search bar to find posts by their post caption or ID.
 ### Step 2: Define the Trigger
Decide exactly what a user needs to type to start the automation.
* **Rule Type:** Choose Any Comment (triggers for everyone) or Keywords (triggers only for specific words).
* **Keywords:** List variations like "#interested", "price", or "details".
* **AI Matching:** Enable Contextual Matching so the bot understands intent even if the user has a typo.
### Step 2: Define the Trigger
Decide exactly what a user needs to type to start the automation.
* **Rule Type:** Choose Any Comment (triggers for everyone) or Keywords (triggers only for specific words).
* **Keywords:** List variations like "#interested", "price", or "details".
* **AI Matching:** Enable Contextual Matching so the bot understands intent even if the user has a typo.
.png?fit=max&auto=format&n=iRMzc6mTqZ14qTDV&q=85&s=0ec815198767b376550c3a96d84445a1 "Image (12)") * **Media (Optional):** You can require users to include an Image or Video in their comment to trigger a response.
* **Media (Optional):** You can require users to include an Image or Video in their comment to trigger a response.
.png?fit=max&auto=format&n=iRMzc6mTqZ14qTDV&q=85&s=1cfa9d962bcfc0b88bbbceb2185ca07e "Image (13)") * **Fallback:** Set a Default Reply for comments that don't match your keywords or arrive outside of your schedule.
* **Fallback:** Set a Default Reply for comments that don't match your keywords or arrive outside of your schedule.
.png?fit=max&auto=format&n=iRMzc6mTqZ14qTDV&q=85&s=237bf3c1f7e06b0a193a5ba4c8f8a0f3 "Image (14)") ### Step 3: Set Your Responses
Choose how the bot will interact with the user.
* **Public Reply:** Type a message that appears directly under the user's comment (e.g: "We've sent you a DM!").
* **Private DM:** Select a Custom Message or a pre-made Automated Flow to be sent to the user's Messenger inbox.
* **Note:** Only one Messenger DM can be sent per trigger.
### Step 3: Set Your Responses
Choose how the bot will interact with the user.
* **Public Reply:** Type a message that appears directly under the user's comment (e.g: "We've sent you a DM!").
* **Private DM:** Select a Custom Message or a pre-made Automated Flow to be sent to the user's Messenger inbox.
* **Note:** Only one Messenger DM can be sent per trigger.
.png?fit=max&auto=format&n=iRMzc6mTqZ14qTDV&q=85&s=a01f72ecec88ea71d6c5634611a407c0 "Image (15)") ### Step 4: Schedule & Launch
Review your settings and turn the bot on.
* **Timing:** Choose to Start Immediately or Schedule for later with a specific date and time.
* **Activate:** Click Activate Automation to go live.
### Step 4: Schedule & Launch
Review your settings and turn the bot on.
* **Timing:** Choose to Start Immediately or Schedule for later with a specific date and time.
* **Activate:** Click Activate Automation to go live.
.png?fit=max&auto=format&n=iRMzc6mTqZ14qTDV&q=85&s=330a9cc1bc86f5ff54ef6cb618af455e "Image (16)") Once activated:
* Users can trigger the automation by commenting on the selected post
* Public replies will appear automatically
* Messenger messages will be delivered based on your response setup
### Test the Automation
After activation:
1. Open the monitored Instagram post
2. Add a test comment
3. Verify:
* The public reply appears correctly
* The Instagram DM is delivered
* Keywords trigger correctly
* Media requirements work as expected
## Campaign Best Practices
To avoid multiple automated responses being triggered for the same user comment, avoid creating campaigns that use:
* The same Instagram post
* The same keywords
* Overlapping campaign dates
**Example:** If two campaigns use the keyword `DM` on the same Instagram post during overlapping periods, multiple automated replies or DM flows may be triggered for the same comment.
Once activated:
* Users can trigger the automation by commenting on the selected post
* Public replies will appear automatically
* Messenger messages will be delivered based on your response setup
### Test the Automation
After activation:
1. Open the monitored Instagram post
2. Add a test comment
3. Verify:
* The public reply appears correctly
* The Instagram DM is delivered
* Keywords trigger correctly
* Media requirements work as expected
## Campaign Best Practices
To avoid multiple automated responses being triggered for the same user comment, avoid creating campaigns that use:
* The same Instagram post
* The same keywords
* Overlapping campaign dates
**Example:** If two campaigns use the keyword `DM` on the same Instagram post during overlapping periods, multiple automated replies or DM flows may be triggered for the same comment.