> ## Documentation Index
> Fetch the complete documentation index at: https://help.aichat.com/llms.txt
> Use this file to discover all available pages before exploring further.
# Configure Single Sign-On (SSO)
This feature is only available at request. Please contact [support@aichat.com](mailto:support@aichat.com) for more information to enable this feature.
Single Sign-On (SSO) simplifies user access and strengthens account security by allowing your team to sign in to AiChat through your organization’s centralized Identity Provider (IdP).
## Prerequisites
Before configuring SSO, make sure the following requirements are met:
* **AiChat administrator access:** You must be an Organization Administrator for the organization you want to configure.
* **Identity Provider permissions:** You must have sufficient administrator permissions in your Identity Provider to create and configure an OIDC or SAML application.
* **Populated email fields:** AiChat uses email addresses to identify and match user accounts. Each directory user must have a valid email address that matches the email used for their AiChat account.
* **SSO feature access:** SSO must be enabled for your organization according to your subscription or contract.
## Supported Identity Provider
AiChat currently supports the following Identity Providers:
| **Provider** | **Protocol** |
| ------------------ | ------------------------------------------------- |
| Microsoft Entra ID | OpenID Connect (OIDC) |
| Google Workspace | Security Assertion Markup Language 2.0 (SAML 2.0) |
## Admin Setup and Sign-In Controls
As an Organization Administrator, you can add, test, and activate an SSO connection from your organization settings.
Once the SSO feature is enabled, you can control which sign-in methods members of your organization are allowed to use. At least one of the following sign-in methods must remain enabled:
* **Magic Link:** Authentication using a link sent to the user’s email address. This method is default option.
* **SSO:** Authentication through the organization’s configured Identity Provider. This method requires the SSO feature to be enabled.
## SSO User Exception List
You can add selected users to the SSO exception list. Users on this list are not required to use SSO and can sign in using another authentication method enabled for the organization.
This option may be useful for approved external users, service accounts, or administrators who require an alternative sign-in method.
## End-User Login Flow
To access an SSO-enabled organization:
1. The user opens the organization-specific AiChat login page.
2. The user selects **Sign in with SSO**.
3. AiChat redirects the user to the organization’s configured Identity Provider.
4. The user completes authentication with the Identity Provider.
5. After successful authentication, the user is redirected to the organization dashboard in AiChat.
# Setting up SSO Connection
### Microsoft Entra ID can be connected to AiChat using OpenID Connect (OIDC).
Before you begin, open AiChat App and the Microsoft Entra admin center in separate browser tabs. You will need to copy information between the two platforms during the setup.
### Information Exchange During Set Up
| **Copy from** | **Information** | **Paste Into** |
| :----------------- | :------------------- | :----------------- |
| AiChat App | Redirect URL | Microsoft Entra ID |
| Microsoft Entra ID | Diectory (tenant) ID | AiChat App |
| Microsoft Entra ID | Client (tenant) ID | AiChat App |
| Microsoft Entra ID | Client Secret Value | AiChat App |
Copy all URLs and identifiers exactly as displayed. Changing a character or removing a trailing slash may cause the connection test to fail.
### Step 1: **Start the connection in AiChat App**
-2.png?fit=max&auto=format&n=S0Bg12019ZOYHpuj&q=85&s=8b8ad853e48f81fa3eadcb638d517188 "Image (15) 2") 1. Sign in to AiChat as an Organization Administrator or Security Manager. Open the organization you want to configure.
2. Create a new SSO connection by going to Settings > Authentication > SSO, and click on \[+ Add connection]
3. In new SSO Connection, input the following
1. Display Name: this name will appear on AiChat Login screen when there is more than 1 SSO connection available
2. Connection Type and Identify Provider: Select **OIDC →** **Microsoft Entra ID**
3. Click **Create new connection**. On the next screen, you’ll be asked to enter more information obtained from Microsoft Entra ID.
1. Sign in to AiChat as an Organization Administrator or Security Manager. Open the organization you want to configure.
2. Create a new SSO connection by going to Settings > Authentication > SSO, and click on \[+ Add connection]
3. In new SSO Connection, input the following
1. Display Name: this name will appear on AiChat Login screen when there is more than 1 SSO connection available
2. Connection Type and Identify Provider: Select **OIDC →** **Microsoft Entra ID**
3. Click **Create new connection**. On the next screen, you’ll be asked to enter more information obtained from Microsoft Entra ID.
 **Keep this page open. You will return to it after configuring the application in Microsoft Entra ID**
### Step 2: **Register AiChat in Microsoft Entra ID**
**Keep this page open. You will return to it after configuring the application in Microsoft Entra ID**
### Step 2: **Register AiChat in Microsoft Entra ID**
.png?fit=max&auto=format&n=S0Bg12019ZOYHpuj&q=85&s=76587592c7d23f5245d57ee045e2ae78 "Image (17)") 1. Sign in to the **Microsoft Azure portal**, then open **Microsoft Entra ID**.
2. From the left navigation menu, select **App registrations**, then click **+ New registration**.
3. Complete the application details:
* **Name:** Enter a recognizable name, such as `AiChat – [Organization name]`.
* **Supported account types:** Select **Single Tenant only**, since only your Azure directory will be integrating with AiChat
* **Redirect URI:** Leave this blank for now. You will configure it in a later step.
4. Click **Register**. You will be redirected to the application’s **Overview** page.
1. Sign in to the **Microsoft Azure portal**, then open **Microsoft Entra ID**.
2. From the left navigation menu, select **App registrations**, then click **+ New registration**.
3. Complete the application details:
* **Name:** Enter a recognizable name, such as `AiChat – [Organization name]`.
* **Supported account types:** Select **Single Tenant only**, since only your Azure directory will be integrating with AiChat
* **Redirect URI:** Leave this blank for now. You will configure it in a later step.
4. Click **Register**. You will be redirected to the application’s **Overview** page.
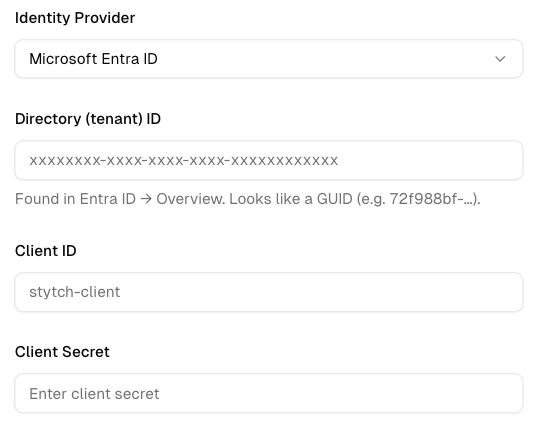
.png?fit=max&auto=format&n=S0Bg12019ZOYHpuj&q=85&s=e3b186702374ae4ba5f7bc30c90b1e2c) ### Step 3: **Complete the connection in AiChat App.**
1. From the application’s **Overview** page in Microsoft Entra ID, copy the following values into the corresponding AiChat fields:
1. Copy **Directory (tenant) ID** into **Directory (tenant) ID**.
2. Copy **Application (client) ID** into **Client ID**.
2. Create a client secret:
1. Under **Client credentials**, select **Add a certificate or secret**.
2. Select **+ New client secret**.
3. Enter a description, choose an expiration period, and click **Add**.
4. Immediately copy the secret from the **Value** column.
5. Paste it into the **Client Secret** field in AiChat.
### Step 3: **Complete the connection in AiChat App.**
1. From the application’s **Overview** page in Microsoft Entra ID, copy the following values into the corresponding AiChat fields:
1. Copy **Directory (tenant) ID** into **Directory (tenant) ID**.
2. Copy **Application (client) ID** into **Client ID**.
2. Create a client secret:
1. Under **Client credentials**, select **Add a certificate or secret**.
2. Select **+ New client secret**.
3. Enter a description, choose an expiration period, and click **Add**.
4. Immediately copy the secret from the **Value** column.
5. Paste it into the **Client Secret** field in AiChat.
-1.png?fit=max&auto=format&n=S0Bg12019ZOYHpuj&q=85&s=b7bdaecdf7133a0df37ba04fe40732f4 "Image (20) 1") **Important:** Copy the client secret **Value**, not the **Secret ID**. The Value is displayed only once.
3. Click **Done** in AiChat to test the connection.
4. If the connection is successful, continue to the next step. If it fails, verify the Tenant ID, Client ID, and Client Secret, then test the connection again.
### Step 4: **Add AiChat redirect URI to Microsoft Entra ID**
1. Copy the **Redirect URL** from AiChat.
2. In Microsoft Entra ID, go to **App registrations > \[your registered application] > Authentication**.
3. Under **Redirect URI tab**, click **Add Redirect URI**.
4. Select **Web**.
5. Paste the AiChat **Redirect URL** into the **Redirect URIs** field.
6. Click **Configure** to save the redirect URI.
**Important:** Copy the client secret **Value**, not the **Secret ID**. The Value is displayed only once.
3. Click **Done** in AiChat to test the connection.
4. If the connection is successful, continue to the next step. If it fails, verify the Tenant ID, Client ID, and Client Secret, then test the connection again.
### Step 4: **Add AiChat redirect URI to Microsoft Entra ID**
1. Copy the **Redirect URL** from AiChat.
2. In Microsoft Entra ID, go to **App registrations > \[your registered application] > Authentication**.
3. Under **Redirect URI tab**, click **Add Redirect URI**.
4. Select **Web**.
5. Paste the AiChat **Redirect URL** into the **Redirect URIs** field.
6. Click **Configure** to save the redirect URI.
-1.png?fit=max&auto=format&n=S0Bg12019ZOYHpuj&q=85&s=6be68e0bc57d3d4b20f9970ee57bfb78 "Image (21) 1") ### Step 5: **Setup email claims in Azure App Registration**
1. Under App Registration > Token Configuration, go to **+ Add optional claim**
2. Add both ID and Access Token Type with **email** as claim. You should have 2 email claims in the list
### Step 5: **Setup email claims in Azure App Registration**
1. Under App Registration > Token Configuration, go to **+ Add optional claim**
2. Add both ID and Access Token Type with **email** as claim. You should have 2 email claims in the list
.png?fit=max&auto=format&n=S0Bg12019ZOYHpuj&q=85&s=e5ddfa86ea2300024f448dba8a7405f6 "Image (22)") ### Step 6: **Configure API permissions**
1. In Microsoft Entra ID, go to **App registrations > \[your application] > API permissions**.
2. Click **Add a permission**, then select **Microsoft Graph > Delegated permissions**.
3. Search for and select these permissions:
* `email`
* `openid`
* `profile`
* `User.Read`
4. Click **Add permissions**.
5. To approve the permissions for all users, click **Grant admin consent for \[your organization]**, then confirm by clicking **Yes**.
### Step 6: **Configure API permissions**
1. In Microsoft Entra ID, go to **App registrations > \[your application] > API permissions**.
2. Click **Add a permission**, then select **Microsoft Graph > Delegated permissions**.
3. Search for and select these permissions:
* `email`
* `openid`
* `profile`
* `User.Read`
4. Click **Add permissions**.
5. To approve the permissions for all users, click **Grant admin consent for \[your organization]**, then confirm by clicking **Yes**.
-1.png?fit=max&auto=format&n=S0Bg12019ZOYHpuj&q=85&s=55fcc9f886e61273fbae97f6801fc6a8 "Image (23) 1")
-1.png?fit=max&auto=format&n=S0Bg12019ZOYHpuj&q=85&s=845ba9dda8ecef5dc5880bfd5ff6ca8e "Image (24) 1") ### Step 7: **Add users and test SSO**
1. Add or invite users to your organization in AiChat platform, then test the SSO connection.
2. Ensure each user’s email address in AiChat matches the **Email** property in Microsoft Entra ID to identify and match the user during SSO authentication.
Ensure each user’s email address in AiChat exactly matches their **primary email address** in Google Workspace. Enabling access to the Google SAML app does not automatically create an AiChat user account.
### Step 7: **Add users and test SSO**
1. Add or invite users to your organization in AiChat platform, then test the SSO connection.
2. Ensure each user’s email address in AiChat matches the **Email** property in Microsoft Entra ID to identify and match the user during SSO authentication.
Ensure each user’s email address in AiChat exactly matches their **primary email address** in Google Workspace. Enabling access to the Google SAML app does not automatically create an AiChat user account.
-1.png?fit=max&auto=format&n=S0Bg12019ZOYHpuj&q=85&s=6149c005f8c7bfd3024b8990b53a5e38 "Image (25) 1") ### Connect using Google Workspace SAML
Before you begin, open the **Google Admin console** and **AiChat Platform** in separate browser tabs. You will need to copy configuration details between the two platforms.
### Prerequisites
Before starting, ensure that:
* SSO is enabled for your organization in AiChat.
* You have **Owner or Organization Administrator** access in AiChat.
* You are signed in to Google Workspace as a **Super Administrator**.
* Each user has a valid primary email address in Google Workspace. AiChat uses this email address to identify and match users.
### Information exchanged during setup
| Copy from | Information | Paste into |
| :--------------- | :----------- | :--------------- |
| Google Workspace | Entity ID | AiChat |
| Google Workspace | SSO URL | AiChat |
| Google Workspace | Certificate | AiChat |
| AiChat | ACS URL | Google Workspace |
| AiChat | Audience URI | Google Workspace |
Copy all URLs, identifiers, and certificate information exactly as displayed. Changing a character, adding spaces, or removing a trailing slash may cause the connection test to fail.
### Connect using Google Workspace SAML
Before you begin, open the **Google Admin console** and **AiChat Platform** in separate browser tabs. You will need to copy configuration details between the two platforms.
### Prerequisites
Before starting, ensure that:
* SSO is enabled for your organization in AiChat.
* You have **Owner or Organization Administrator** access in AiChat.
* You are signed in to Google Workspace as a **Super Administrator**.
* Each user has a valid primary email address in Google Workspace. AiChat uses this email address to identify and match users.
### Information exchanged during setup
| Copy from | Information | Paste into |
| :--------------- | :----------- | :--------------- |
| Google Workspace | Entity ID | AiChat |
| Google Workspace | SSO URL | AiChat |
| Google Workspace | Certificate | AiChat |
| AiChat | ACS URL | Google Workspace |
| AiChat | Audience URI | Google Workspace |
Copy all URLs, identifiers, and certificate information exactly as displayed. Changing a character, adding spaces, or removing a trailing slash may cause the connection test to fail.
-1.png?fit=max&auto=format&n=S0Bg12019ZOYHpuj&q=85&s=e1cb40a800762ca6c7adab5e7f918569 "Image (26) 1") ### Step 1: Start in AiChat Platform
1. Sign in to the **AiChat Platform**.
2. Go to **Settings > Authentication > SSO**.
3. Click **+ Add connection**.
4. Complete the following fields:
* **Display Name:** Enter a recognizable name, such as `Google Workspace`. This name appears on the AiChat login screen when more than one SSO connection is available.
* **Identity Provider:** Select **Google Workspace**.
* **Connection Type:** Select **SAML**.
5. Click **Create new connection**.
6. Keep this browser tab open. The next screen contains information you will need when configuring Google Workspace.
### Step 2: Create a custom SAML app in Google Workspace
### Step 1: Start in AiChat Platform
1. Sign in to the **AiChat Platform**.
2. Go to **Settings > Authentication > SSO**.
3. Click **+ Add connection**.
4. Complete the following fields:
* **Display Name:** Enter a recognizable name, such as `Google Workspace`. This name appears on the AiChat login screen when more than one SSO connection is available.
* **Identity Provider:** Select **Google Workspace**.
* **Connection Type:** Select **SAML**.
5. Click **Create new connection**.
6. Keep this browser tab open. The next screen contains information you will need when configuring Google Workspace.
### Step 2: Create a custom SAML app in Google Workspace
-1.png?fit=max&auto=format&n=S0Bg12019ZOYHpuj&q=85&s=ce928328436ef564c6a7fb7fd7c76dec "Image (27) 1") 1. In a separate browser tab, sign in to the [Google Admin console](https://admin.google.com/).
2. Go to **Apps > Web and mobile apps**
1. In a separate browser tab, sign in to the [Google Admin console](https://admin.google.com/).
2. Go to **Apps > Web and mobile apps**
-1.png?fit=max&auto=format&n=S0Bg12019ZOYHpuj&q=85&s=912ceaeaa5ee65f530929914e96924b3 "Image (28) 1") 3. Click **Add app > Add custom SAML app**.
4. Enter an app name to help you identify it will be integrating with AiChat platform
5. Click **Continue**.
### Step 3: Copy Google Workspace information to AiChat
On the **Google Identity Provider details** page, copy the following information into AiChat:
1. Copy **Entity ID** and paste it into **IdP Entity ID**.
2. Copy **SSO URL** and paste it into **IdP SSO URL**.
3. Certificate contents → X509 Certificate
3. Click **Add app > Add custom SAML app**.
4. Enter an app name to help you identify it will be integrating with AiChat platform
5. Click **Continue**.
### Step 3: Copy Google Workspace information to AiChat
On the **Google Identity Provider details** page, copy the following information into AiChat:
1. Copy **Entity ID** and paste it into **IdP Entity ID**.
2. Copy **SSO URL** and paste it into **IdP SSO URL**.
3. Certificate contents → X509 Certificate
.png?fit=max&auto=format&n=S0Bg12019ZOYHpuj&q=85&s=7eddc4621afef9593424d11df7ef8d75 "Image (29)") ### Step 4: Add AiChat service provider details to Google
Click next on Google "Add custom SAML app". Copy the following values from AiChat to Google
1. **ACS URL → ACS URL**
2. **Audience URI → Entity ID**
3. Under NAME ID, leave ID Format as **UNSPECIFIED**, and Name ID as **Basic Information > Primary Email**
4. Click **Continue**.
### Step 4: Add AiChat service provider details to Google
Click next on Google "Add custom SAML app". Copy the following values from AiChat to Google
1. **ACS URL → ACS URL**
2. **Audience URI → Entity ID**
3. Under NAME ID, leave ID Format as **UNSPECIFIED**, and Name ID as **Basic Information > Primary Email**
4. Click **Continue**.
.png?fit=max&auto=format&n=S0Bg12019ZOYHpuj&q=85&s=4e0d886940e87c9251200677076b4e40)
.png?fit=max&auto=format&n=S0Bg12019ZOYHpuj&q=85&s=d8f5fb8f8873e59b2ba2fbdbb43707a4) ### Step 5: Configure the email attribute
1. Under **Attribute mapping**, click **Add mapping**.
2. Configure the mapping:
* **Google Directory attribute:** Select **Basic Information > Primary email**.
* **App attribute:** Enter `email`.
### Step 5: Configure the email attribute
1. Under **Attribute mapping**, click **Add mapping**.
2. Configure the mapping:
* **Google Directory attribute:** Select **Basic Information > Primary email**.
* **App attribute:** Enter `email`.
.png?fit=max&auto=format&n=S0Bg12019ZOYHpuj&q=85&s=380aae1ad91fc6ff1f7e11e09d28bbbb "Image (34)") 3. Click **Finish** to create the SAML app.
### Step 6: Enable user access
The new SAML app must be enabled before users can sign in.
1. Open the newly created **AiChat Platform** SAML app.
2. Click **User access**.
3. Choose who can use the app:
* Select **On for everyone** to enable access for the entire organization.
* Select specific organizational units or access groups to limit access.
4. Click **Save**.
Google Workspace changes can take up to 24 hours to apply, although they usually take effect sooner.
3. Click **Finish** to create the SAML app.
### Step 6: Enable user access
The new SAML app must be enabled before users can sign in.
1. Open the newly created **AiChat Platform** SAML app.
2. Click **User access**.
3. Choose who can use the app:
* Select **On for everyone** to enable access for the entire organization.
* Select specific organizational units or access groups to limit access.
4. Click **Save**.
Google Workspace changes can take up to 24 hours to apply, although they usually take effect sooner.
.png?fit=max&auto=format&n=S0Bg12019ZOYHpuj&q=85&s=8600b494af212b88dbb301bb7236980f "Image (35)") ### Step 7: Test and save the connection
1. Return to the **AiChat Platform**.
2. Click **Test connection**.
3. Sign in with an authorized Google Workspace account when prompted.
4. After the test is successful, save and activate the connection.
Ensure each user’s email address in AiChat exactly matches their **primary email address** in Google Workspace. Enabling access to the Google SAML app does not automatically create an AiChat user account.
## Additional authentication settings
After activating SSO, an Organization Administrator can configure using various login methods that are available. At least one login method must remain enabled.
You can also exclude selected users from mandatory SSO. This allows those users to sign in using another enabled authentication method if your identity provider is temporarily unavailable.
The SSO name can be changed later, subject to availability. SSO names are assigned on a first-come, first-served basis.
### Step 7: Test and save the connection
1. Return to the **AiChat Platform**.
2. Click **Test connection**.
3. Sign in with an authorized Google Workspace account when prompted.
4. After the test is successful, save and activate the connection.
Ensure each user’s email address in AiChat exactly matches their **primary email address** in Google Workspace. Enabling access to the Google SAML app does not automatically create an AiChat user account.
## Additional authentication settings
After activating SSO, an Organization Administrator can configure using various login methods that are available. At least one login method must remain enabled.
You can also exclude selected users from mandatory SSO. This allows those users to sign in using another enabled authentication method if your identity provider is temporarily unavailable.
The SSO name can be changed later, subject to availability. SSO names are assigned on a first-come, first-served basis.