1. Knowledge Base Content Guidelines
Before indexing any data, ensure your source materials adhere to the following principles:Clarity and Readability
- Simple Language: Use straightforward terminology. Avoid overly complex jargon unless absolutely necessary and clearly defined.
- Structured Formatting: Utilize headings, bullet points, and numbered lists within your source documents (e.g., PDFs, website content). This improves readability for both human users and the chatbot’s indexing process.
- Note: images containing text cannot be extracted by our bot
Comprehensiveness and Accuracy
- Cover Key Topics: Ensure the knowledge base covers all major aspects of your products, services, policies, and frequently asked questions.
- Up-to-Date Information: Regularly review and update your source content to maintain accuracy. Outdated information leads to poor chatbot performance and user frustration.
- Internal Consistency: Verify that information across different documents or sections does not contradict itself.
2. Supported Data Sourcing Methods
Our AiChat platform supports indexing information from multiple source types to build a robust knowledge base:| Data Source | Description | Best Use Case |
|---|---|---|
| Website Crawl (URL) | Indexing content directly from specified public web pages or domains. | Dynamic content, detailed product documentation, or broad site-wide information. |
| Documents | Uploading and indexing content from PDF, Word and CSV files. | Policy documents, user manuals, long-form guides, or technical specifications. |
| Text Snippets | Manually entering short pieces of text directly into the platform. | Specific definitions, disclaimers, or information not yet captured in other formats. |
| Q&A Pairs (Question and Answer) | Structuring information as specific question-and-answer pairs. | Addressing Frequently Asked Questions (FAQs) that require precise, defined responses. |
Crawling Websites
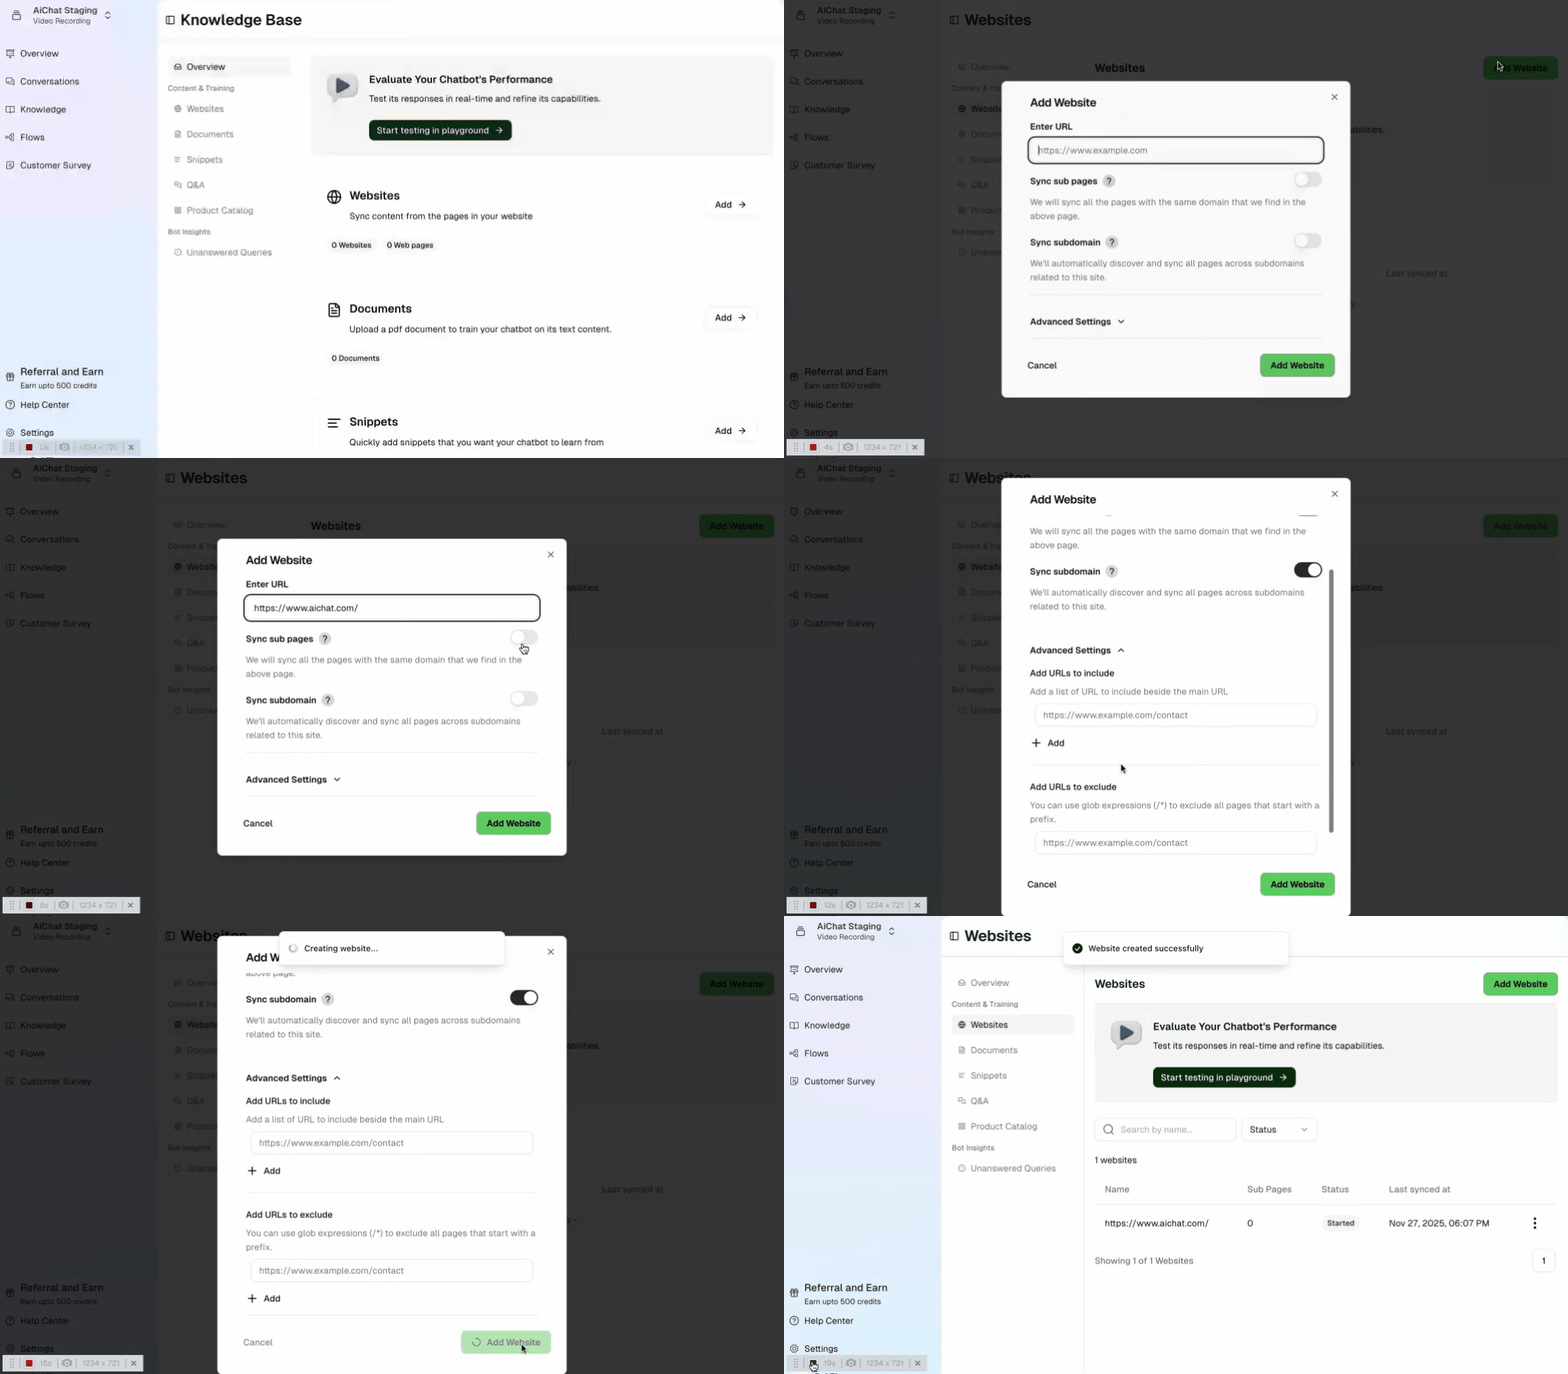
Indexing a Website (Crawl)- Go to the Knowledge Base tab in the left-hand menu.
- Click on Websites.
- Click the “Add Website” button.
- Enter the main URL you want the chatbot to learn from (e.g., [https://www.yourcompany.com/]

- Search and Filter: Quickly find sites by searching or filtering by processing status (e.g., Indexed, Failed).
- Last Synced At: Shows the time of the most recent data update from the website.
Website Statuses Explained
| Status | Description |
|---|---|
| Processing | The chatbot is currently extracting and analyzing content from the website. |
| Indexed | Content has been successfully integrated and is now used by the chatbot for responses. |
| Failed | An error occurred. Check the URL format and access permissions, then re-add the website. |
Crawling Website FAQ
My sub-pages are not crawled
My sub-pages are not crawled
If you’re crawling subpages on a website but only one page is being crawled despite expecting multiple under the URL path, check the following:
- Geo-Blocking Restrictions: Does your website have geo-blocking enabled? If our crawlers are outside your allowed geo-location countries, they may be unable to access your site or may be redirected to a fallback page.
- Asynchronous JavaScript or Single-Page Application (SPA): Does your website rely on asynchronous JavaScript or an SPA framework? If so, content may not be fully loaded when our crawlers attempt to access it.
The bot is not responding with knowledge from crawled pages
The bot is not responding with knowledge from crawled pages
Your webpage’s content may not be set up correctly for crawling.
- Image-Based Content: If your webpage contains only images, our crawler may not be able to extract information, as it currently supports text-based content.
- JavaScript Rendering: If your webpage uses scripts to render content after our crawler has loaded the page, some content may not be captured.
Do I need to crawl pages that are localised to different languages?
Do I need to crawl pages that are localised to different languages?
Our bot does not require the same knowledge in different languages, as we can translate it into the customer’s language. However, if the content differs by language, please crawl the specific pages so our bot can recognize the differences. You can exclude localized pages using the ‘Exclude’ feature under Advanced Settings.
Uploading Documents
The Documents feature allows you to upload and extract content from files, helping the chatbot respond accurately based on structured knowledge. This is useful for handling policy documents, product manuals, long-form guides, and other reference materials.
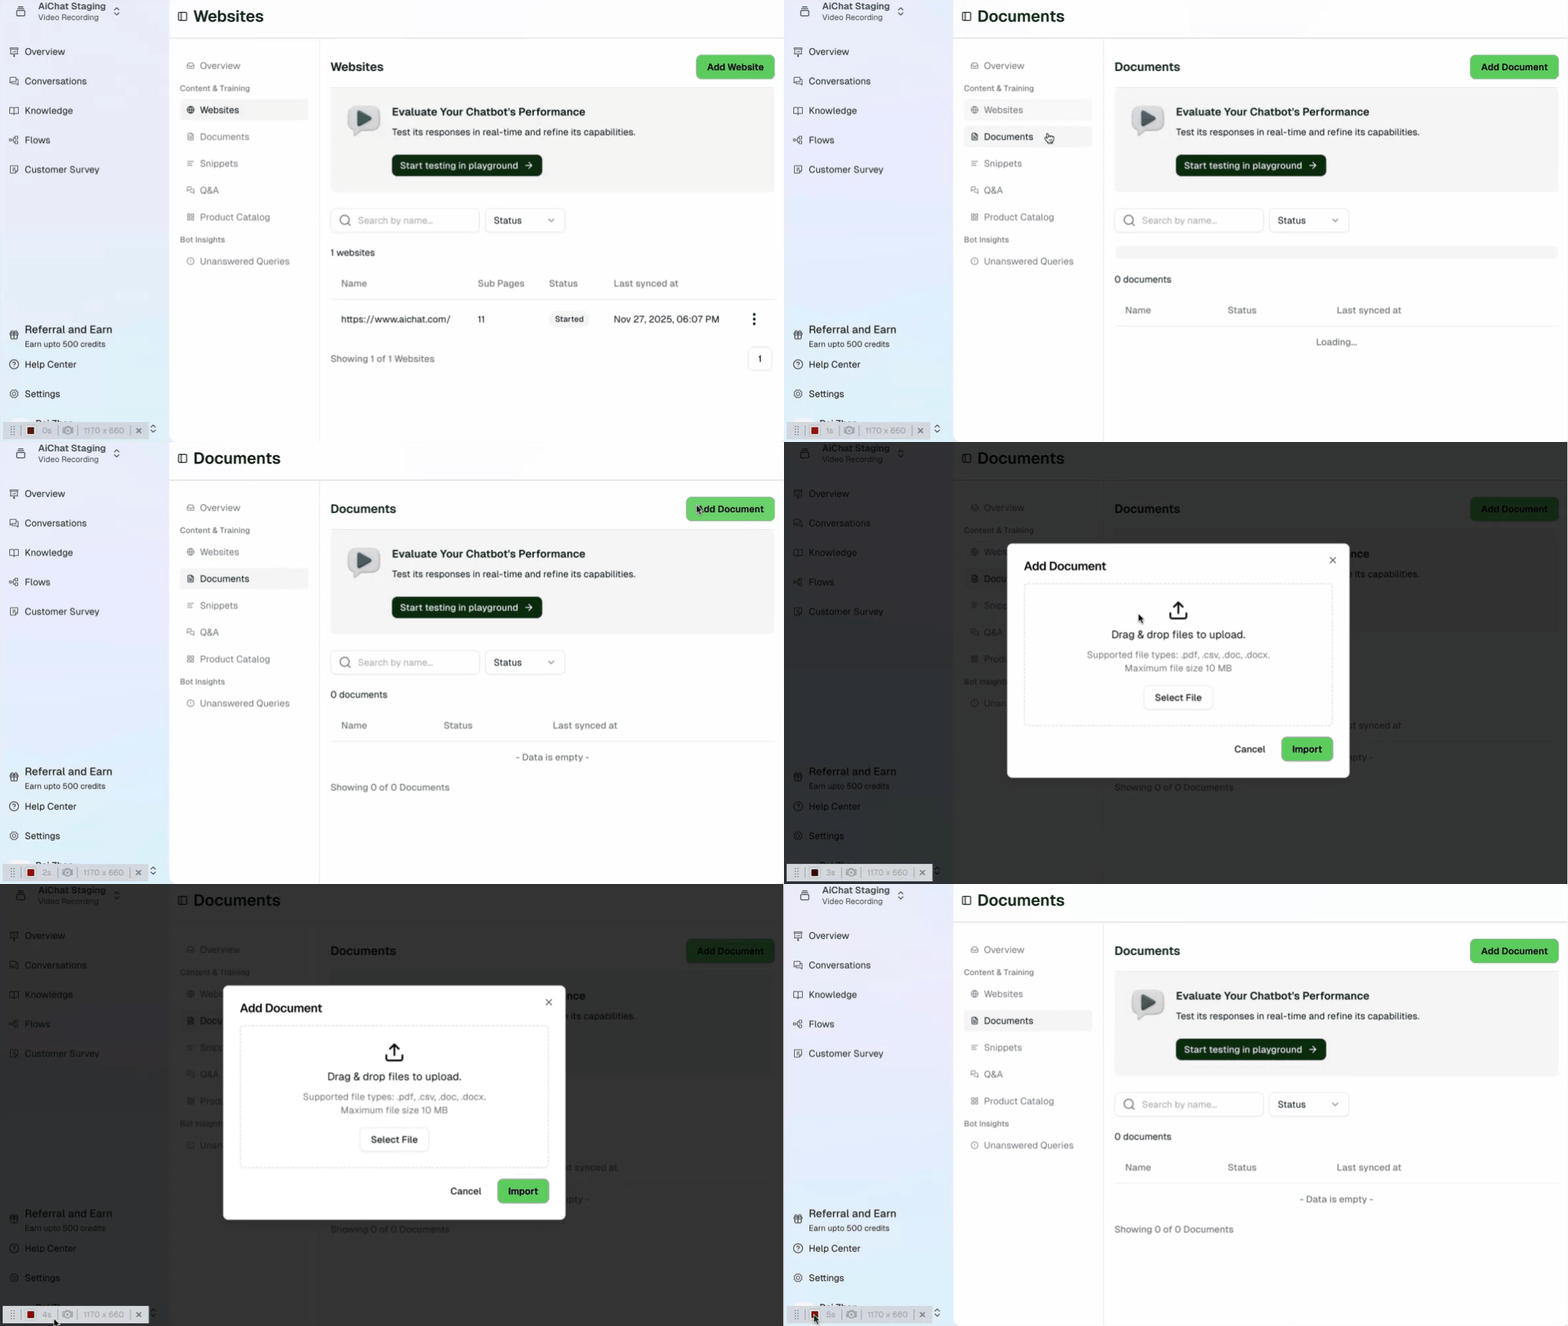
- Access the Documents Section
Under the dashboard, go to the Knowledge Base tab from the left-hand menu. Click on Documents to access the document management page. - Upload a Document for Chatbot Knowledge
- Click the “Add Document” button.
- Select a file (supported formats: PDF, DOCX, TXT, CSV.).
- The system will process the content to extract relevant information.
- Manage Document Entries
Once uploaded, you can manage and monitor your documents from the Documents Section:- Use the search bar to find specific documents.
- Filter by status (e.g., Processing, Indexed, Failed).
- The Last Synced At column indicates when the document was last updated in the chatbot’s database.
Document Statuses Explained
| Status | Description |
|---|---|
| Processing | The chatbot is analyzing the document content. |
| Indexed | The document data is successfully added and available for chatbot responses. |
| Failed | An issue occurred during indexing. Check the file format or content and ensure it is not password-protected before attempting to re-upload. |
Using Text Snippets
Text snippets allow you to add or update chatbot content instantly. They are useful for last-minute updates, time-sensitive announcements, or temporary information that may need quick modifications.
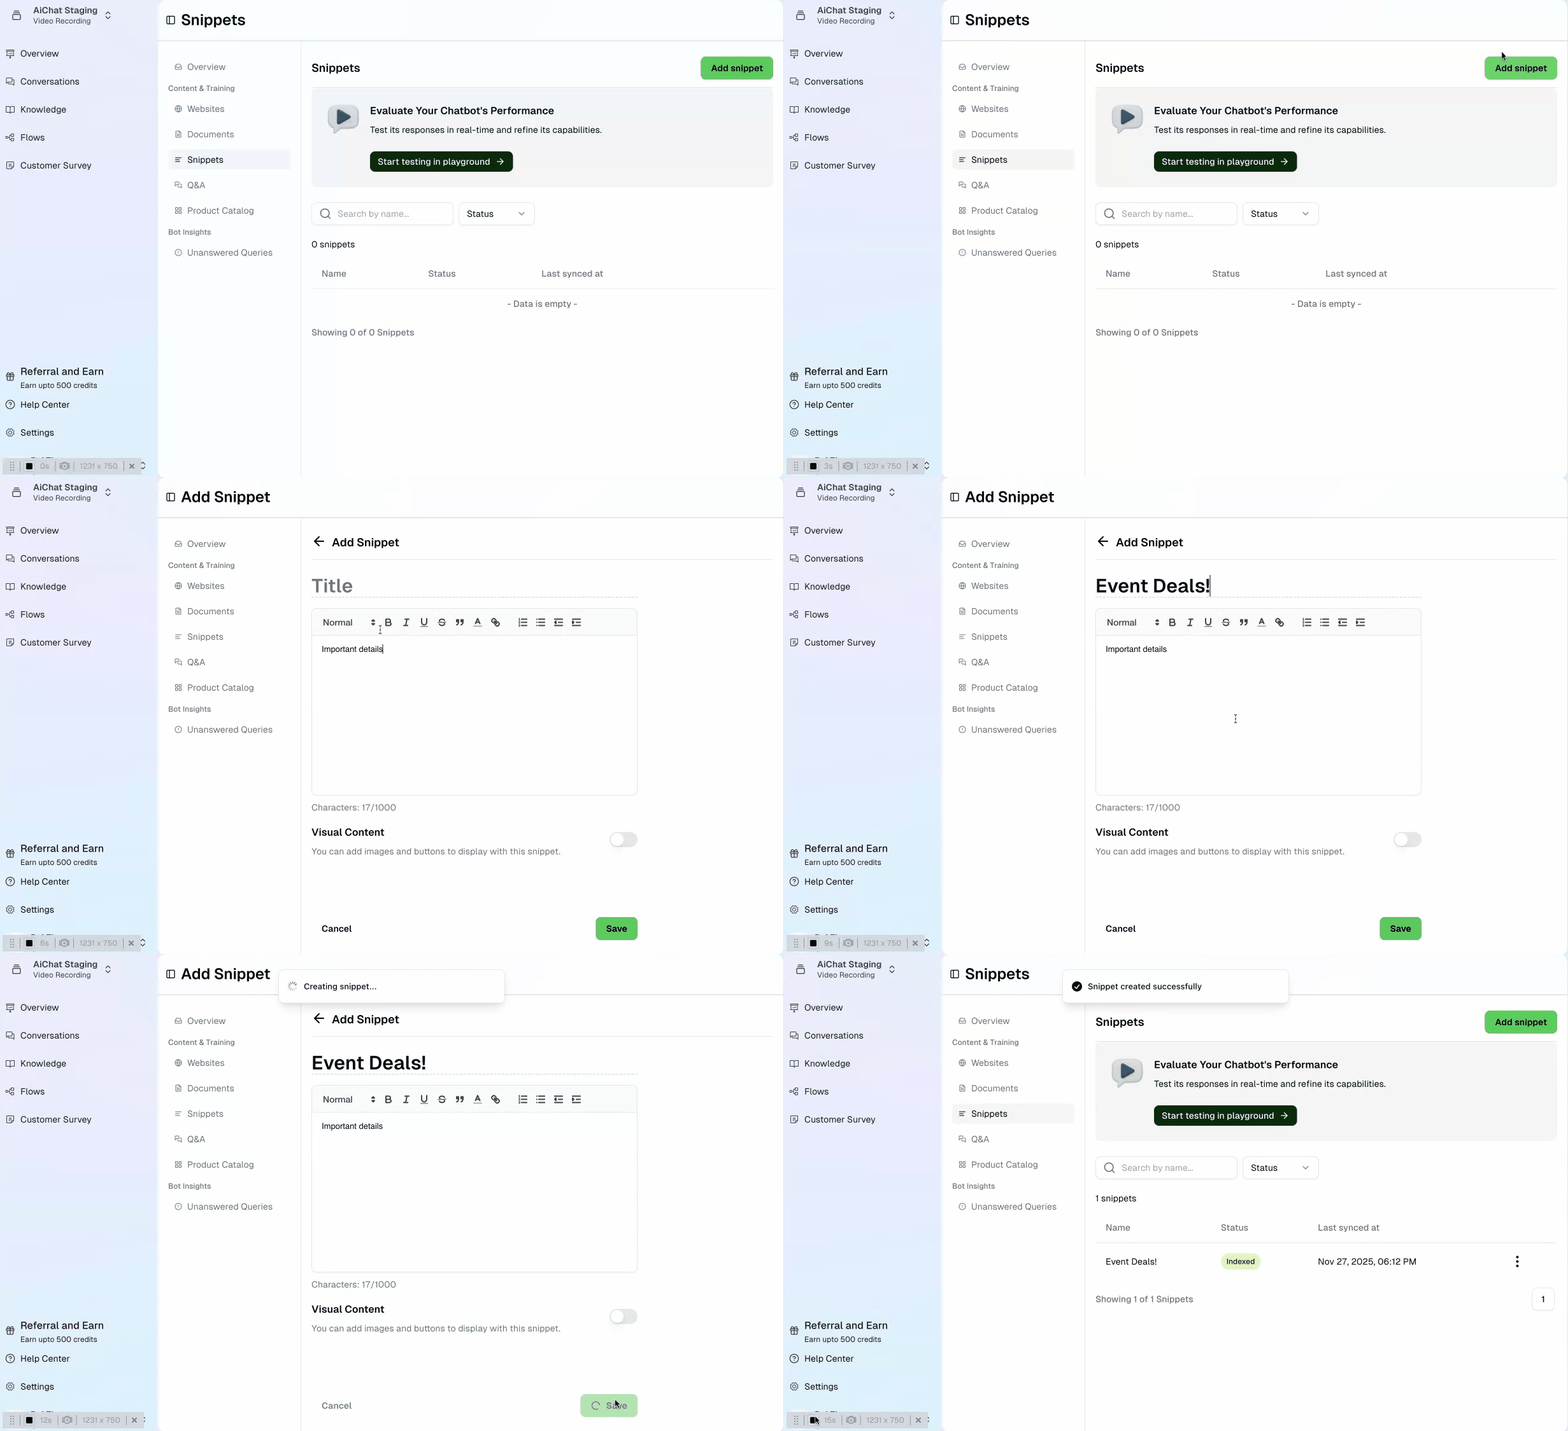
- Go to the Text Snippets Section:
- In your AiChat dashboard, look at the menu on the left.
- Click on the Knowledge Base tab.
- Select Text Snippets to open the management screen.
- Start a New Snippet:
- Click the “Add Snippet” button. A new editing window will pop up.
- Give it a Title:
- Type a clear and descriptive title in the Title field. This helps you and your team easily find the snippet later.
- Write Your Content:
- Enter or paste your text into the main text box.
- Use the formatting tools (like the bold ‘B’, italic ‘I’, and underline ‘U’) to make your text easy to read, or to add links and lists.
- Keep it Short:
- Snippets have a limit of 1,000 characters.
- A character counter at the bottom will help you track how much space you have left.
- Click the green “Save” button to store your new snippet.
- If you change your mind and don’t want to save, click “Cancel” to discard your work.
Manage Snippet Entries
Once created, you can manage and monitor your text snippets from the Snippets Section:- Use the search bar to find specific snippets by title or content.
- The Last Updated At column indicates when the snippet was last modified.
- You can Edit or Delete existing snippets using the action icons.
Managing Q&A: Giving Your Chatbot Direct Answers
The Q&A section is where you teach your chatbot specific, accurate answers to common questions. This method helps your chatbot respond reliably to user queries without having to guess or rely only on information it crawls from websites or documents.
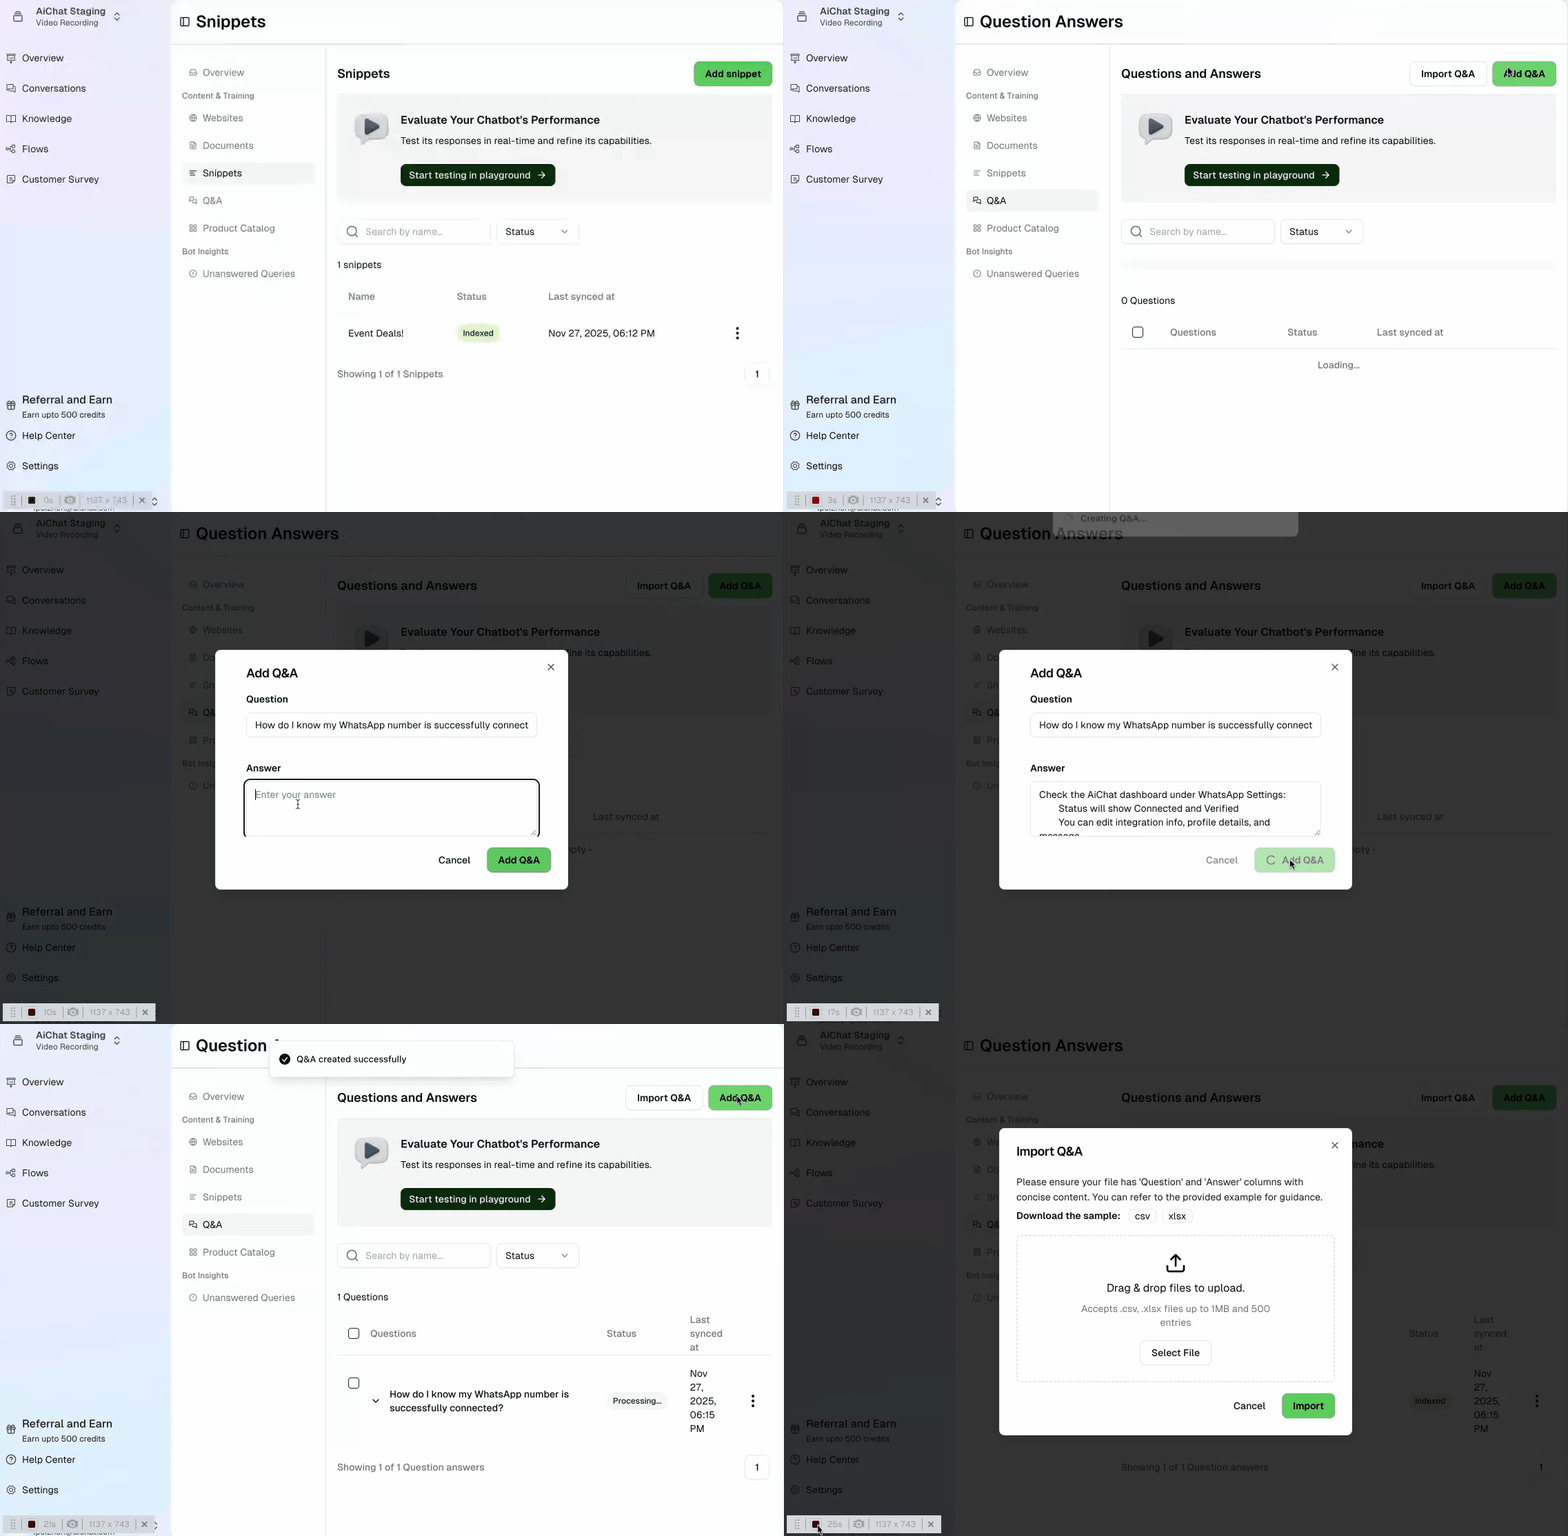
- In your AiChat dashboard, look at the left menu and go to Knowledge.
- Click on Q&A to open the management page.
Manually Add Q&A:
- Click the green “Add Q&A” button in the top right corner.
- Type the exact question a user might ask.
- Type the precise answer the chatbot should give.
- Click Save.
Bulk Upload via CSV:
This is the fastest way to add many pairs at once.- Click the “Import CSV” button.
- Upload a CSV file that is formatted correctly with your questions and answers.
- The system will automatically process and add all the new entries.
- Search Bar: Use the search bar to quickly find any specific Q&A pair.
- Filter Entries: You can filter the list based on their status (e.g., Processing, Indexed, Failed).
- Last Synced: Check the last synced column to see when an entry was last updated or processed.
Ensuring Your Q&A Entries Are Ready (Indexing Status)
Once you add a Q&A pair, the system needs a moment to process it before the chatbot can use it. The status column will show:| Status | What it Means |
|---|---|
| Processing | The system is currently indexing the Q&A entry. |
| Indexed | The entry was successfully added and is ready for the chatbot to use. |
| Failed | An issue occurred. Please check the entry or the CSV file and re-upload if necessary. |